#"Merged Columns" = Table.CombineColumns(Table.TransformColumnTypes(#"Previous Step Name", {{"Column2", type text}}, "en-GB"),{"Column1", "Column2"},Combiner.CombineTextByDelimiter("", QuoteStyle.None),"Column1"),
Power BI, Power Query, Campaigns, Stats, Data Visualization, Raiser's Edge, Excel, GDPR and Data Protection. What could possibly be more fun?
Wednesday, 25 May 2022
Joining/Merging Columns in a single step
Remove/Replacing part of a string in Power Query
If you like keeping things neat and understandable in Power BI then you probably like to minimise things to one line. So there are times when, yeah, you could create a new IF column and then delete the original and rename it, but you're probably asking "how can I do this in one line of M code?"
Here's a solution for when you're trying to either remove a certain string(s) within a field, (as well as links to one that shows how to replace them).
Remove part of a string in a field
Say I have a field like this:
My Column
Which platforms do you use? Select all that apply
Tick those which work for you. Select all that apply
Which would you recommend? Select all that apply
Which are value for money? Select all that apply
Select all that apply
I want to get rid of all those uses of "Select all that apply". If I use the standard "replace" tool in Power Query it will blank the fifth line and leave the others untouched. I could create a new column here and then delete the original and rename the new one, but to do it in one move I can use this formula in the Advanced Editor:
#"Replaced Value" = Table.TransformColumns(#"Previous Step Name",{{"My Column", each List.Accumulate({{"Select all that apply","XX"}},_,(string,replace) => Text.Replace(string,replace{0},replace{1}))}})
Where "XX" is the term you are replacing it with (in this case just put "" i.e. blank).*
It turns out you can also hit several replace terms in one columns at once by adding them into the second set of double curly brackets. So, if I want to replace xx with XX, yy with YY and zz with ZZ in Column1, I can do it like this
#"Replaced Value" = Table.TransformColumns(#"Previous Step Name",{{"Column1", each List.Accumulate({{"xx","XX"},{"yy","YY"},{"zz","ZZ"}},_,(string,replace) => Text.Replace(string,replace{0},replace{1}))}})
Alternatively if you want to hit multiple fields you can do that too. So, if I want to replace xx with XX in column1, and bb with BB in Column2 I can write:
#"Replaced Value" = Table.TransformColumns(#"Previous Step Name",{
{"Column1", each List.Accumulate({{"xx","XX"}},_,(string,replace) => Text.Replace(string,replace{0},replace{1}))},
{"Column2", each List.Accumulate({{"bb","BB"}},_,(string,replace) => Text.Replace(string,replace{0},replace{1}))}
})
And obviously you can do both together if you wish.
*I found this info in the comments to the two videos included in this blog post by Guru G. The blog post itself covers two similar operations, 1. Removing multiple single characters from a field (video) & 2. Replacing a strings within a field with another string (video).
Edit
Here's another simpler way from The Biccountant which is closer to the code you get if you use the standard tool.
= Table.ReplaceValue(#"Previous Step Name", each [Text to remove], "" ,Replacer.ReplaceText,{"Field to remove it from"})Where the field containing the info you want to remove is called [Text to remove] and the field you are removing it from is called [Field to remove it from].
If you want to replace it with a specific value you just write a word or phrase in text in double quotes.
Alternatively, rather than a blank or text you can replace with the contents of another field, you just add this into the 3rd term like so:
= Table.ReplaceValue(#"Previous Step Name", each [Text to remove], each [Text to replace with], Replacer.ReplaceText,{"Field to remove it from"})
Friday, 1 April 2022
Regex Differs Between Google Analytics and Google Search Console
^/news/$
h.*datageek\.com/news/$
Friday, 1 November 2019
Replace markers with a style
A couple of things to note.
- Firstly the reason I've used "¬" & "|" is that other marks such as "@", "~", "#", "<" and ">" may not work for you (for various reasons), but it doesn't have to be those two, feel free to find what works for you. You may need to use Find and Replace beforehand to get these two in position
- Secondly, it won't replace the "¬" & "|" you'll have to go and do that afterwards.
The joys of a Microsoft product.
Tuesday, 10 April 2018
Transaction Assignments / Assignment Filters in Online Express
If you've poked about curiously within the back end of Raiser's Edge Online Express you may have come across the Transaction Assignments / Assignment Filters area within Account Integration Options. There's criminally little support documentation for Online Express, but this area in general seems to have nothing at all in it, not even a knowledgebase article. There are a couple of pieces for the equivalent documentation for Net Community and Sphere. And of course, there's trial and error.
Essentially this only works for donations at the moment - it doesn't work for event transactions (or email obviously). It also doesn't allow you to exclude certain security groups to be able to see it. This is a big Data Protection concern within Online Express but the Blackbaud team don't appear overly concerned to fix it.
What it does
What it does allow you to do is to make life easier for certain groups of people. If you have two different teams processing two different sets of donations you can move a bunch of them out of their way, so they just see the relevant ones.
How to do it
To do this you need to create an assignment filter on the screen above. You can choose a security group (step 1) and filter in on the basis of Fund, Appeal or Donor surname (!?) (step 2), choosing the criteria (e.g. which fund etc.) in step 3.
On the second tab (below) you can add groups who you still want to be able to view and process all transaction. The last two boxes are the ones that matter. If you tick "Show unassigned transactions tab" a new tab appears in the "Download transactions" window. The original tab only contains those you filter in. All the rest appear in the new one.
The second box lets you make the other (non-relevant transactions) read only so only approved staff can process them.
Thursday, 22 February 2018
Speeding Up Adding Guests to RE Events

I've had a query from someone who is finding adding guests to a host very frustrating. Here are the details:
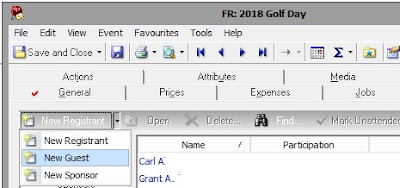
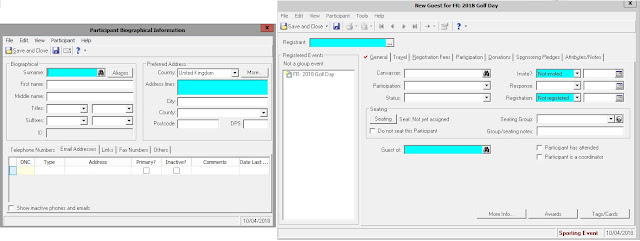
I'm working on an event and need to add in a large number of guests, but can't I access the guest's participant record from the guest button on the bottom of the primary participants record. On the host's record I can add each guest in and mark them as attended (or not) and registered (or not), but nothing else.I do have a marginally less annoying method. If you go to the Participants tab of the event and then change the drop down button top left to "New guests" (above) then that takes you through to the page below (left) where you enter names and addresses. Then when you save that it returns you to the participant record page (below right) already expecting a guest.
In order to do that I then have to either look them up from the main event record, open them up, and update them OR I have to click on their entry in the whole list to select each one, update them, get back to host's record, and then use the button to get to the next person, etc.
It's not ideal, but I think it might be better than the more "intuitive" options.

Thursday, 2 November 2017
RE: Making a Business Rule Inactive
Firstly you need to set up a blank Security group - Go to Admin/Security/New Group to do this.
If you want to play it extra safe, untick all the boxes on the left. The crucial point is not to add any of your users into the Group Members field in the middle
Wednesday, 25 October 2017
Getting the Red Tick for RE New Modules
Turns out there was a simple answer - The Volunteer MOdule (and perhaps others) doesn't automatically turn on this functionality for itself, you have to do it manually as a user.
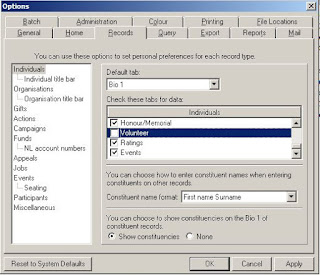
To do this you simply go to: Tools / User Options / Records / Individuals then scroll down the list and you'll see the volunteer tab box is not ticked.

Check it and you're away. Now any data in the volunteer module will put a tab on. Another one for the new user checklist!
Monday, 9 October 2017
Get a List of Excel Tab Names and Compare Headers on Multiple Tabs
1. Go to Formulas > Define Name
2. Then in the New Name box, put Tabs in to the "Name" box
3. In "Refers to" paste in this formula =SUBSTITUTE(GET.WORKBOOK(1),"["&GET.WORKBOOK(16)&"]","") & click OK
4. Paste this formula into cell A1 =INDEX(Tabs,ROWS($A$1:$A1))
5. From the bottom right corner of A1, drag the black square for as many cells as there are tabs
This should give you a nice long list of of your tab names.
You can then use this to allow you to compare headings
Compare Headers on Multiple Tabs
If you have a list of Tab headings in Col A then to get a compare list do as follows:
a. In cell B1 type this formula ="¬'"&$A1&"'!B2"
b. Drag that down to your last active row
c. Copy and paste-as-text into column C
d. Make sure that Number Format is marked as "Text"
e. Now select that column and do a find a replace, swapping ¬ for =.
f. Now change the number format to "General" - This should give you a list of the first header on each sheet.
g. Now with all active cells in col C selected, drag right as far as you need.
h. You should now see all your headers and can see how they compare to each other.
Note - if you make changes in the cells of the original headers these should be reflected, but if you delete or move sheets these changes will not reflect and might make things worse.
Monday, 2 October 2017
What GDPR compliant privacy notices will require
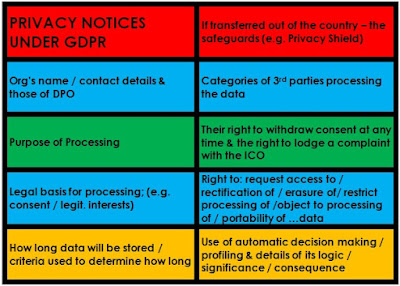
Under GDPR the rules about the information you need to include in a Privacy Notice are changing, requiring more information and information that is more specific.
The information can be layered, but it's still a bit unclear how much needs to be provided at the time of sign-up and how much can just be included in a separate printed / online version
There are full details available from the ICO, but the above is a useful quick guide.


