Friday, 1 April 2022

Regex Differs Between Google Analytics and Google Search Console

If you're working with both Google Analytics and Google Search Console you've probably tried at some stage to get your head around regex. Regex is brilliant and is well worth investing time into getting to know. It's used by numerous platforms, but does vary a little from platform to platform.

However, Google takes things a step further. Regex is different on Google Analytics than it is in Google Search Console. 

This is particularly noticeable if you're trying to filter your search by URL and want to use markers to tie your needle to either the start or the end of the URL. Ordinarily you use a caret ^ to tie your search term to the start of the available text (or line), and a dollar sign $ to tie to the end. But Google complicates this.

So for Google Analytics if you want to find only those pages ending in your search term you use the $. If you want to make sure that this comes straight off the homepage you only need to include the caret - no need to refer to the stem. So if your domain is https://www.datageek.com using
^/news/$
Will find solely https://www.datageek.com/news/, no sub pages and not others like https://www.datageek.com/someothersection/news/

To do the same in Google Search Console though seems to want you to account for the variations in the stem, So to do the same as the above in Search Console you have to use
h.*datageek\.com/news/$
You would think Google would just choose one, but apparently not...

Friday, 1 November 2019

Replace markers with a style

There's a useful blog post here on how to convert text formatted in a certain way in MS Word with something else. What it doesn't do, though, is show you how to do the reverse. The process is broadly similar but you just need to set up your find and replace box like this

This will find anything between a "¬" and a "|" (pipe mark, next to the z on a UK keyboard) and replace it in blue.

A couple of things to note.

- Firstly the reason I've used "¬" & "|" is that other marks such as "@", "~", "#", "<" and ">" may not work for you (for various reasons), but it doesn't have to be those two, feel free to find what works for you. You may need to use Find and Replace beforehand to get these two in position

- Secondly, it won't replace the "¬" & "|" you'll have to go and do that afterwards.

The joys of a Microsoft product.

Tuesday, 10 April 2018

Transaction Assignments / Assignment Filters in Online Express


If you've poked about curiously within the back end of Raiser's Edge Online Express you may have come across the Transaction Assignments / Assignment Filters area within Account Integration Options. There's criminally little support documentation for Online Express, but this area in general seems to have nothing at all in it, not even a knowledgebase article. There are a couple of pieces for the equivalent documentation for Net Community and Sphere. And of course, there's trial and error.

Essentially this only works for donations at the moment - it doesn't work for event transactions (or email obviously). It also doesn't allow you to exclude certain security groups to be able to see it. This is a big Data Protection concern within Online Express but the Blackbaud team don't appear overly concerned to fix it.

What it does
What it does allow you to do is to make life easier for certain groups of people. If you have two different teams processing two different sets of donations you can move a bunch of them out of their way, so they just see the relevant ones.

How to do it
To do this you need to create an assignment filter on the screen above. You can choose a security group (step 1) and filter in on the basis of Fund, Appeal or Donor surname (!?) (step 2), choosing the criteria (e.g. which fund etc.) in step 3.

On the second tab (below) you can add groups who you still want to be able to view and process all transaction. The last two boxes are the ones that matter. If you tick "Show unassigned transactions tab" a new tab appears in the "Download transactions" window. The original tab only contains those you filter in. All the rest appear in the new one.

The second box lets you make the other (non-relevant transactions) read only so only approved staff can process them.

Thursday, 22 February 2018

Speeding Up Adding Guests to RE Events


I've had a query from someone who is finding adding guests to a host very frustrating. Here are the details:
I'm working on an event and need to add in a large number of guests, but can't I access the guest's participant record from the guest button on the bottom of the primary participants record.  On the host's record I can add each guest in and mark them as attended (or not) and registered (or not), but nothing else.

In order to do that I then have to either look them up from the main event record, open them up, and update them OR I have to click on their entry in the whole list to select each one, update them, get back to host's record, and then use the button to get to the next person, etc.
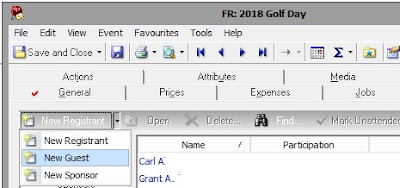
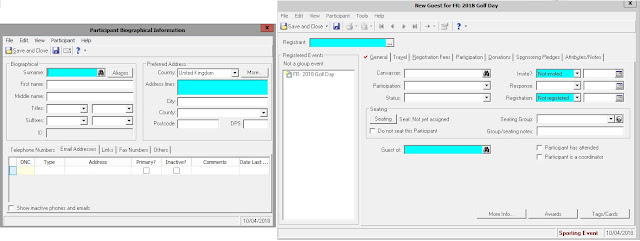
I do have a marginally less annoying method. If you go to the Participants tab of the event and then change the drop down button top left to "New guests" (above) then that takes you through to the page below (left) where you enter names and addresses.  Then when you save that it returns you to the participant record page (below right) already expecting a guest.
It's not ideal, but I think it might be better than the more "intuitive" options.

Thursday, 2 November 2017

RE: Making a Business Rule Inactive

Business Rules are really useful feature of The Raiser's Edge, but at present there is no simple way to make them inactive, or temporarily suspend them. There is a work around however.

Firstly you need to set up a blank Security group - Go to Admin/Security/New Group to do this.

If you want to play it extra safe, untick all the boxes on the left. The crucial point is not to add any of your users into the Group Members field in the middle


Now you need to go the Business rule itself (Config/Business Rules/User Defined Rules) open it up...

 Now tick "Apply Rule to Selected Security Groups Only" and choose the security group you created above.

In effect this applies the rules to no actual real users, but as far as RE is concerned there is a user group that the rule is applied to so it's happy.

Wednesday, 25 October 2017

Getting the Red Tick for RE New Modules

I'm exploring the Raiser's Edge Volunteer Module at the moment, but been wondering why even records that don't have data aren't getting the red tick / red checkmark on the constituent's volunteer tab. Was it that it only did when a Job was assigned? A Timesheet?

Turns out there was a simple answer - The Volunteer MOdule (and perhaps others) doesn't automatically turn on this functionality for itself, you have to do it manually as a user.

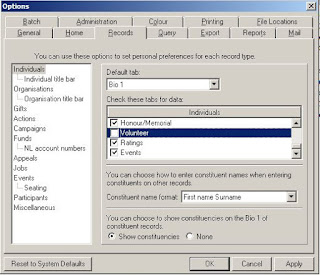
To do this you simply go to: Tools / User Options / Records / Individuals then scroll down the list and you'll see the volunteer tab box is not ticked.

Check it and you're away. Now any data in the volunteer module will put a tab on. Another one for the new user checklist!

Monday, 9 October 2017

Get a List of Excel Tab Names and Compare Headers on Multiple Tabs

Get a List of Excel Tab Names
1. Go to Formulas > Define Name
2. Then in the New Name box, put Tabs in to the "Name" box
3. In "Refers to" paste in this formula =SUBSTITUTE(GET.WORKBOOK(1),"["&GET.WORKBOOK(16)&"]","") & click OK
4. Paste this formula into cell A1 =INDEX(Tabs,ROWS($A$1:$A1))
5. From the bottom right corner of A1, drag the black square for as many cells as there are tabs

This should give you a nice long list of of your tab names.
You can then use this to allow you to compare headings


Compare Headers on Multiple Tabs
If you have a list of Tab headings in Col A then to get a compare list do as follows:

a. In cell B1 type this formula ="¬'"&$A1&"'!B2"
b. Drag that down to your last active row
c. Copy and paste-as-text into column C
d. Make sure that Number Format is marked as "Text"
e. Now select that column and do a find a replace, swapping ¬ for =.
f. Now change the number format to "General" - This should give you a list of the first header on each sheet.
g. Now with all active cells in col C selected, drag right as far as you need.
h. You should now see all your headers and can see how they compare to each other.

Note - if you make changes in the cells of the original headers these should be reflected, but if you delete or move sheets these changes will not reflect and might make things worse.

Monday, 2 October 2017

What GDPR compliant privacy notices will require


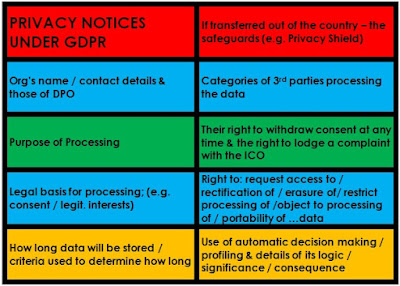
Under GDPR the rules about the information you need to include in a Privacy Notice are changing, requiring more information and information that is more specific.

The information can be layered, but it's still a bit unclear how much needs to be provided at the time of sign-up and how much can just be included in a separate printed / online version

There are full details available from the ICO, but the above is a useful quick guide.

Tuesday, 12 September 2017

Adding Guests More Quickly in the Events Module

If you run the kind of event whereby one table hosts buys up a load of seats for their guests, and you use Raiser's Edge, you'll probably of faced the problem of trying to add them on without having to add them as a guest, go back and then finish adding their details.

But, have stumbled across a (perhaps) marginally less annoying method. It looks like if you go to the Participants tab of the event and then change the drop down button top left to "New guests"...

...then that takes you through to the page where you enter names and addresses and then when you save that it returns you to the participant record page already expecting a guest. It's not ideal, but I think it might be better than the main alternative.

You can also set up Default Sets to speed things up a little bit.


Tuesday, 17 May 2011

Replying to Job Interviewees/Applicants

A couple of years ago I was involved in recruiting new staff to my organisation. The official policy was not to reply to those applicants who didn't even make it to interview. Call me a rebel if you like, but I flouted that policy and would certainly do so again. More recently I've was applying for jobs, and faced the same type of policy from the other side of the fence.

Leaving aside the rudeness of such a policy, I want to look at why this is bad strategy and a missed opportunity.

Applying for jobs takes most people hours. Often you’ve not heard a great deal about an organisation but you scour their website, get your head round their passion, mission, vision and values, you imagine yourself in the post, how you would suit it and daydream about what it might be like. In short you grow an affinity with it.

At other times it’s already an organisation you already care about and are involved in. If it's a charity you might occasionally donate money. If it's a business you might occasionally shop there or use their services.

Either way when after all your hard work the organisation in question can’t even be bothered to take a minute to send you a rejection email / letter, you can feel quite put out. All that interest and connectedness you feel with them dissipates because of their rudeness.

This is particularly bad choice for networking organisations, which are built by making good contacts, developing them and growing connections. It's also a bad choice for charitable organisations who are potentially putting off potential donors, or retail organisations who are losing (potential) customers. Can anyone afford to waste that for the sake of a quick generic email? It's even possible that whilst the applicant wasn't suited to that particular role, they might excel in another role for you down the line.

No-one likes rejecting applicants, but a quick email or even a letter thanking them for their interest maintains the connection they feel. They’re disappointed of course, but people get used to that job hunting. The validation, however small, is important and maintains the opportunity to make the most of what the person does have to offer in future.